Learn Your Next Admin Superpower
What if I told you SOQL could be your next Admin superpower? Even better, what if I told you it was super easy to learn?
It’s true. SOQL is awesome and easy to learn. And knowing SOQL will give you an edge whenever you need to pull and view data in your org super fast.
But if SOQL is so great and easy to learn, why don’t more admins use it?
Unfortunately, learning SOQL is often intricately tied to learning Apex. This is even true for Trailhead’s SOQL for Admins module which insists you must complete several Apex units as a prerequisite. While there are good reasons for this, SOQL alone is a great admin tool and you don’t need to write (or know!) a single line of Apex to use it.
So, good news! Today you’re going to learn SOQL — your next admin superpower!

What is SOQL?
SOQL is short for Salesforce Object Query Language. It’s used to find and pull a subset of records from your org for easy viewing and manipulation. A single query can return anywhere from one to thousands of records.
What Can SOQL do for Admins?
What’s the first tool an Admin might reach for when they need to see their org’s data fast? A report? A list view? Excel?! Often we find ourselves exporting data, creating reports, or adding filters and fields to list views to organize, view, and make sense of our data. This can be cumbersome and a bit of a pain.
SOQL, on the other hand, allows us to write a quick query and see the data immediately. It’s like creating a tabular or summary report really fast. For example, you can write a quick, one-line SOQL query to do the following:
- Find all opportunities with duplicate names.
- Create a list of accounts with their corresponding number of opportunities.
- See which users haven’t logged in to Salesforce in the last 30 days.
- Find the account with the most ‘Closed Won’ opportunities.
- Create an on-the-fly summary table of your opportunity pipeline broken down by fiscal year and quarter.
- Generate a list of permission sets with their assigned users.
- Find the sum of all ‘Closed Won’ opportunities last year.
- Find all cases created today with a status of ‘Escalated’ or ‘New’.
- Write a query to replicate what a Get Records element will retrieve when designing a flow.
- Access quirky or “hidden” Salesforce object likes OpportunityShare, UserRecordAccess, or LoginHistory.
Want to do all of the above super fast without exporting data, creating a new report, or manipulating a list view? SOQL makes it easy!
For some of you, learning SOQL may sound a bit complicated or intimidating. But it’s not. In fact, there are no programming skills or software needed — just you, your org, and the dev console.
Getting Started
To start, I recommend using a developer org to practice. While a SOQL query itself can not manipulate (create, update, or delete) any of your data, the interface you’ll be using can. (It would take some effort on your part to make a change, but just to be safe, use a developer org for now.) Plus, the examples in this post (including screenshots) use the default data found in the standard dev org. If you don’t already have one, you can sign up for a free one here: https://developer.salesforce.com/signup
Opening the Developer Console
Once you have your org set up, the first thing you’ll need to do is open the developer console. Don’t panic. It’s easy to find and easy to use. First, click on the gear icon in the upper right-hand corner (the same one used to access Setup). Next, Select Developer Console and a new pop-up screen will open.
![]()
That’s it. You just found and opened the developer console. Easy peasy. Next, in the middle of the console, click on the tab that says Query Editor.

Running Your First SOQL Query
Now, copy and paste the following SOQL query into the pane that contains the phrase Enter SOQL or SOSL query:
SELECT Id, Name FROM Account
To see the results, click the Execute button at the bottom of the dev console. The results show up in the Query Grid.
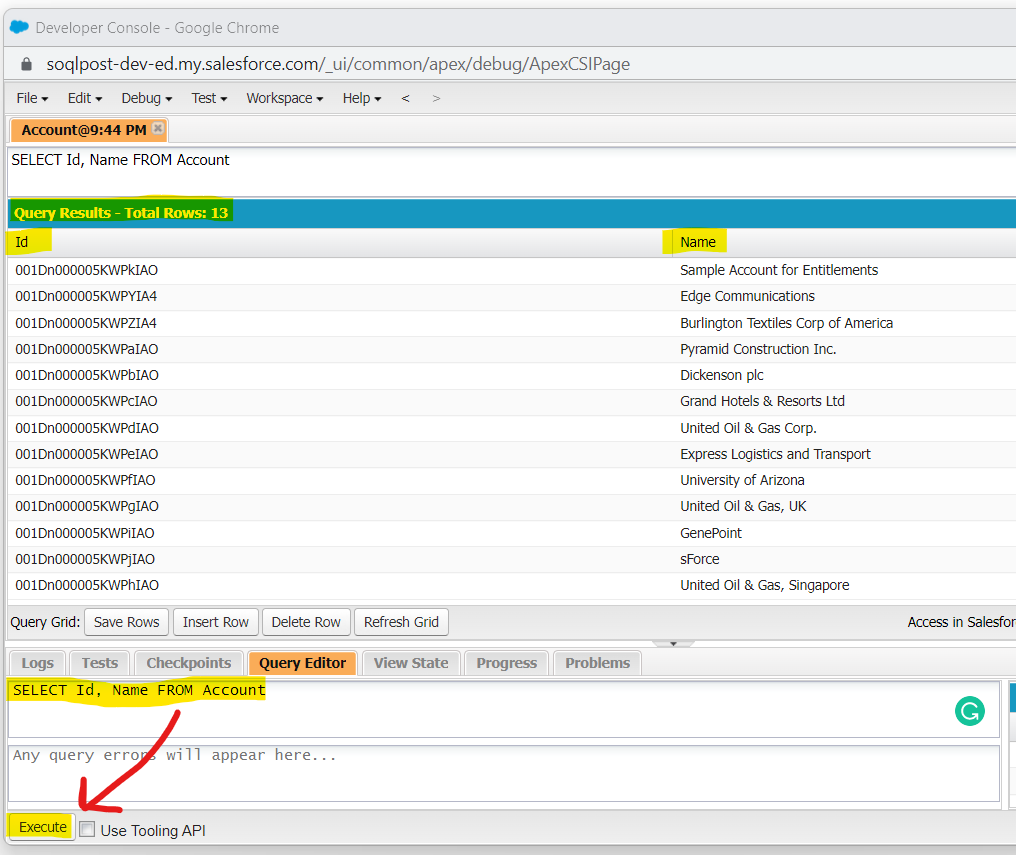
Congratulations, you just ran your first SOQL query! Now, let’s break it down.
SOQL Syntax: SELECT
The first keyword in any query is SELECT. It’s always followed by a list of field names separated by commas. Here, you’re selecting the fields you want to see returned for each record in the query. These field names must be associated with the object that follows the FROM keyword.
SELECT is always required and is commonly written in all capital letters (but it doesn’t have to be for the query to work). In our example, SELECT is followed by the fields Id and Name. And that’s exactly what was returned in the results — the Id and Name of every Account in our dev org (see screenshot above to confirm).
Field Names vs. Field Labels
Please note that these are the field names, not the field labels (what users see on the record detail page). Field names are sometimes referred to as API names. Also, it’s worth noting that field names for many standard objects often match their field labels when they’re just a single word (eg, Name, Amount, Email).
If you ever have trouble remembering field names, open up Object Manager in a new tab and select the object, and then Fields & Relationships. In the next installment (Part 2), I’ll show you a shortcut to these fields inside the dev console.
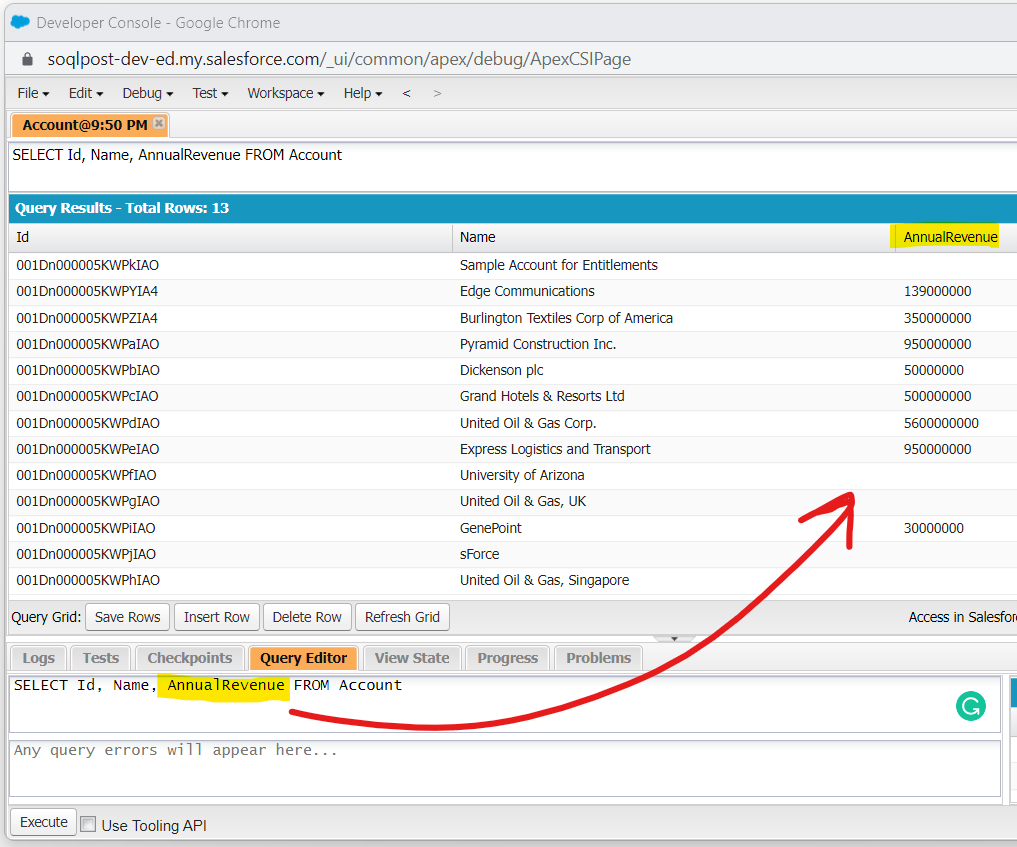
Now, go ahead and add another field — just make sure you use the field name (not the field label) and use a comma before it. I’m going to add AnnualRevenue but you can choose something else.
SELECT Id, Name, AnnualRevenue FROM Account
Click the Execute button again and you should see the new field added to the results. Easy!
On Your Own: There’s a picklist field on Account that lets us know if the company is hot or not. What field could you add to the SELECT clause above to return this information when the query is run? Add the field and run the query. If you get stuck, pull up an account record to see if you can find the field. Tip: The field label and its API name are the same.
SOQL Syntax: FROM
Next in the query, we see the keyword FROM. This is always followed by the sObject (the Salesforce Object) we are querying. Examples of an sObject include Account, Contact, Opportunity, and Case. In this example, we are querying the Account object.
With FROM, we’re saying pull the records (with the fields we selected) from this object. Like SELECT, the FROM keyword is always required. (And, in case you’re wondering, you can only list one object after FROM.)
To practice, go ahead and change the object. Just make sure the field names correspond to the new object, like this:
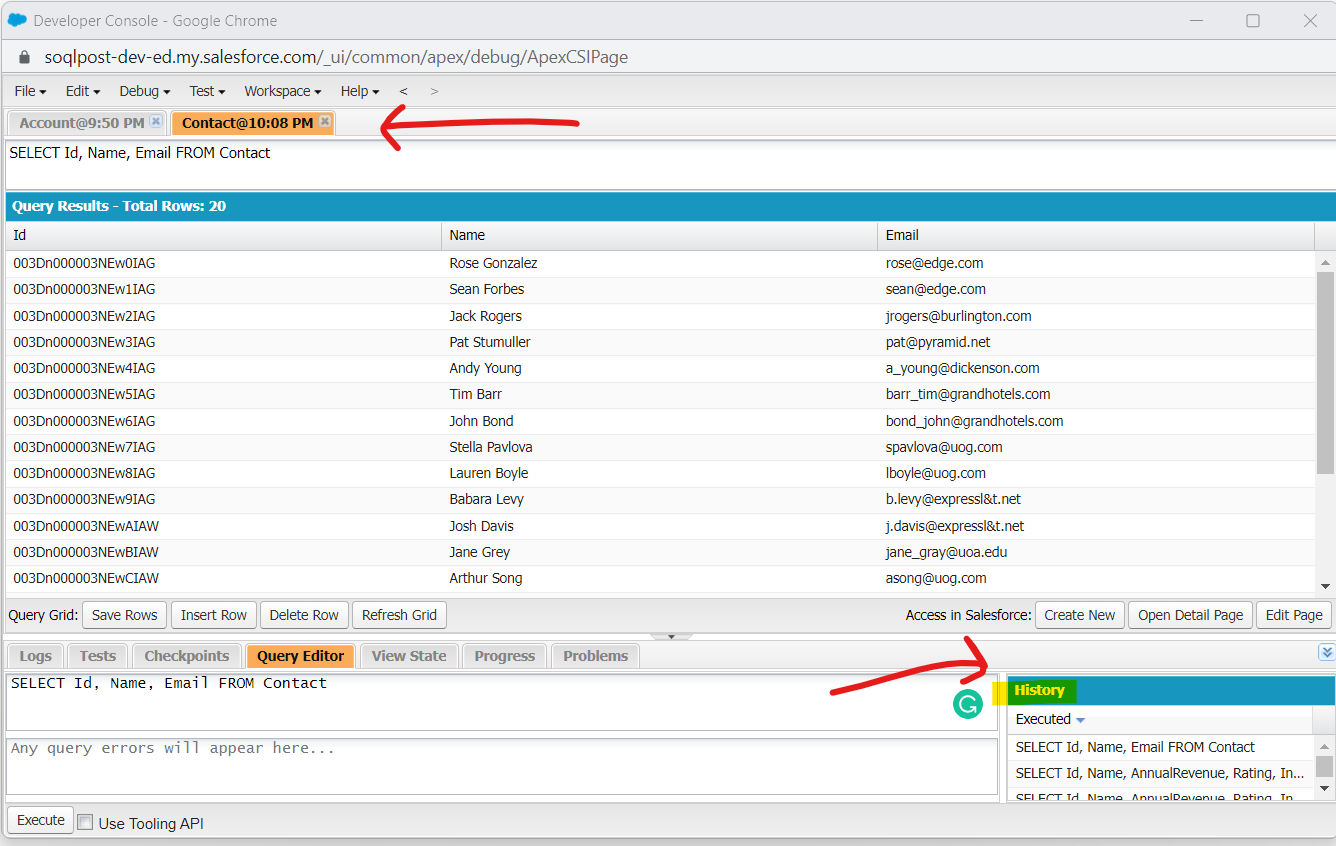
SELECT Id, Name, Email FROM Contact
Click the Execute button again, and your new query will show up. (Notice that a new tab opens for each new query, and a new row is added to the SOQL history panel to the right.)
On Your Own: The Case object is one of the few commonly used objects in Salesforce without a name field. What field could you include in the SELECT clause instead to quickly identify records? Write the SOQL query and run it in your dev org. What other Case fields could you add that would be useful? Tip: Use Object Manager to find a list of Case API names and their types.
Using Custom Fields and Objects
If you want to query a custom field or object, you will need to remember to include the __c suffix when referencing the API name. (The suffix consists of a double underscore followed by a lowercase “c”.) As an example, if you were to create a custom checkbox field on the contact object that references their newsletter subscriber status (Newsletter_Subscriber__c), the field, with its custom suffix (__c), needs to be included in your SOQL query:
SELECT Id, Name, Newsletter_Subscriber__c FROM Contact
The same is true for custom objects. Let’s say you created a custom invoice object. If you wanted to reference it in a SOQL query, you would need to include its __c suffix:
SELECT Id, Name FROM Invoice__c
Filtering SOQL Results: WHERE
But what if we don’t want all of our object records returned in a query? How do we filter our results? We do this by adding a WHERE clause. WHERE filters the results on one or more fields.
Most of us write SOQL queries that include a WHERE clause for two reasons. First, Salesforce governor limits restrict the number of records returned to 50,000 per transaction. But it will only return 2,000 records in a query editor (similar to the limit we find in Report Builder). So, if we know an object holds more than that, we need a way to filter the records to ensure fewer are returned.
Second — and perhaps more important for our purposes — even if we didn’t have that many records in our org, we still want to limit the number returned to a manageable and meaningful size. This is because the power of SOQL lies in finding specific data fast. We don’t want to sift through hundreds or thousands of records looking for key information. Instead, we want to filter a query so that the information we want is returned in a small subset of records.
As an example, what if we just wanted to see accounts that had an annual revenue greater than $50,000,000? To do that, we would add the following WHERE clause after the FROM statement:
SELECT Id, Name, AnnualRevenue FROM Account WHERE AnnualRevenue > 50000000
Notice that we don’t add the dollar sign ($) in front of the amount or use delimiters (eg, commas or periods) in the value. We also don’t put the value in single quotes (like we would for an Id, text, or picklist value).
Comparison Operators: =, >, <, !=
Notice, too, that after the WHERE clause, we have a comparison operator. In this case, it is the greater than sign (>). We can use other comparison operators in SOQL queries, such as =, <, <= (less than or equal), and != (not equal). As you can see, these help us create very specific filters to narrow down our results.
Copy and paste the above query into the dev console and execute it. The number of records returned is now reduced since we’re restricting the results.
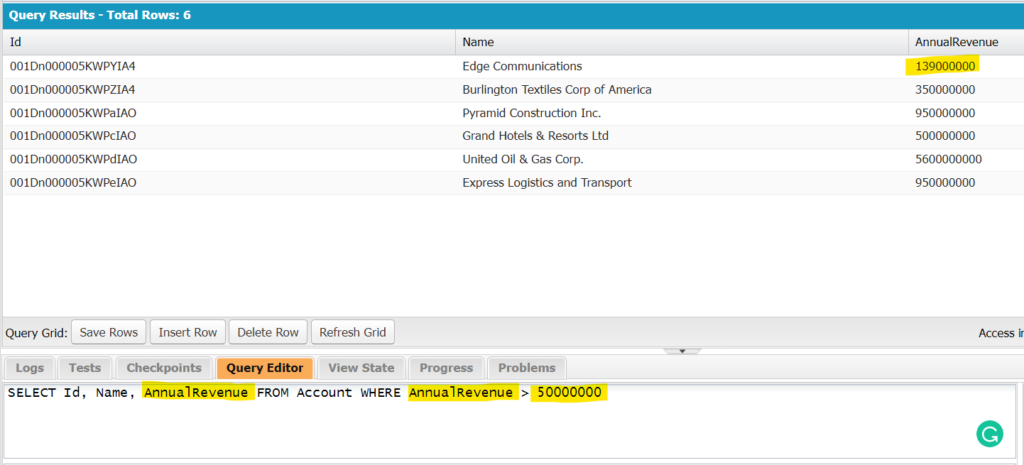
You may have noticed that we also included the AnnualRevenue field within the SELECT portion, but we didn’t need to. That said, it helps us quickly check to see if the intended results were returned. Looking at the AnnualRevenue column, we can confirm that none are $50,000,000 or lower.
On Your Own: Run the query above without the WHERE clause. How many rows did it return? Now run it with the following WHERE clause: WHERE AnnualRevenue >= 0. How many records showed up now? Why were there fewer than before? (Stumped? Be sure to look at the AnnualRevenue results for each query. How do they differ?)
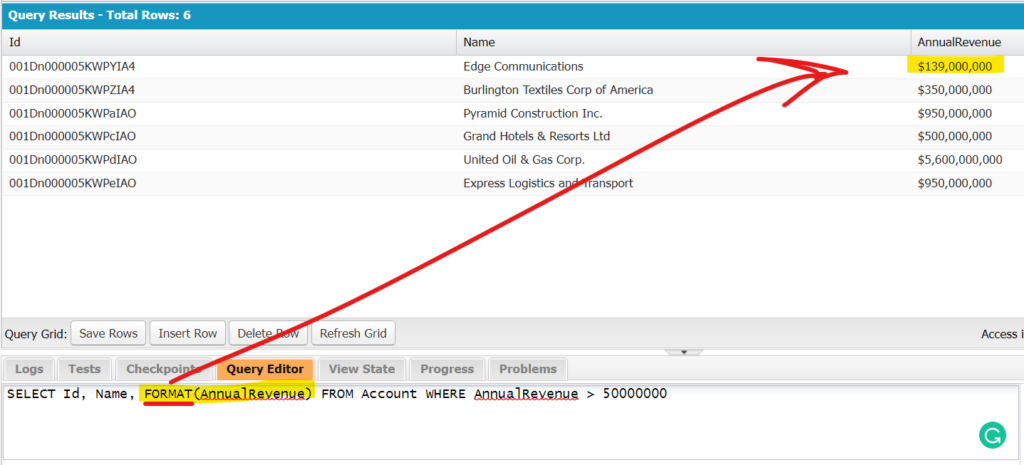
Show Me the $: FORMAT()
In the screenshot above, you can see that the AnnualRevenue column is a bit hard to read since the values have lost their currency formatting. Fortunately, this is easy to fix. To make a currency, number, or date field more readable, use the FORMAT() function. To do so, you simply wrap the field in it like this:
SELECT Id, Name, FORMAT(AnnualRevenue) FROM Account WHERE AnnualRevenue > 50000000
Using Dates and Date Literals in WHERE clauses
Things can get a little tricky when using dates in WHERE clauses. This is because many standard system fields we assume are simply date fields are actually date/time fields. This includes favorites such as CreatedDate, LastModifiedDate, and LastViewedDate.
To handle these correctly in our WHERE clause, we need to reference the time in addition to the date. For example, if we wanted to pull all account records that were created on or after January 1, 2023, we would need to include the time as well (using one of several compatible date/time field formats).
SELECT Id, Name, CreatedDate FROM Account Where CreatedDate > 2023-01-01T00:00:00Z
The above dateTime field syntax uses YYYY-MM-DDThh:mm:ssZ.
But since this is a bit of a bother, we can easily get around it by using date literals instead. Examples of these include TODAY, YESTERDAY, TOMORROW, THIS_WEEK, LAST_WEEK, NEXT_MONTH, THIS_QUARTER and LAST_YEAR. For instance, if we wanted to use a date literal for the above query (so that it pulled all accounts created this year), we would use THIS_YEAR with the equals (=) comparison operator:
SELECT Id, Name, CreatedDate FROM Account Where CreatedDate = THIS_YEAR
There are a large number of Salesforce date literals to choose from, and it’s important to remember that they are all dynamic. That means, depending on when you run the query, the results will change. (You may have noticed these are very similar to relative dates used in report and list view filters.)
Also, some of these date literals include a number variable, indicated as n. For these, we must supply the n value. For example, LAST_N_DAYS:n. To include records created in the last 45 days, we would write it as CreatedDate = LAST_N_DAYS:45.
On Your Own: How can you change the above query to only return accounts created in the last 7 days? Write and run the SOQL query in the dev console. Also, how could you update the query to improve the readability of the created date?
Ordering Your Results: ORDER BY
By now, maybe you’ve noticed that the results are not returned in any particular order (or at least, no obvious order). But what if we want to see the results in alphabetical order by account name? For this, we need to use the ORDER BY clause. Here, we’re telling the query to order the returned records by a specific field.
SELECT Id, Name, AnnualRevenue FROM Account WHERE AnnualRevenue > 50000000 ORDER BY Name
This returns the same records in alphabetic order by the Name field.
But what if we’d rather have the records ordered by the AnnualRevenue field instead? Just replace Name in the ORDER BY condition with AnnualRevenue.
SELECT Id, Name, AnnualRevenue FROM Account WHERE AnnualRevenue > 50000000 ORDER BY AnnualRevenue
If you copy and paste the above query into the dev console, you’ll notice the returned records are ordered by the annual revenue amount from lowest to highest (ascending order). If we want the records to be listed in reverse order, highest to lowest, we need to add the DESC (descending) keyword after the ORDER BY clause.
  SELECT Id, Name, AnnualRevenue
    FROM Account
   WHERE AnnualRevenue > 50000000
ORDER BY AnnualRevenue DESC
By default, a query that uses an ORDER BY filter will return records in ascending order (lowest to highest for numbers, alphabetically for text fields, and earliest to most recent for date fields). If we want, we can clarify (to ourselves and anyone else reading our query) that the order is ascending by adding the ASC statement (instead of DESC).
What about picklist values? Will these be filtered in alphabetic order? No, these are conveniently presented in the order they appear in the picklist drop-down menu for ascending (ASC), and in the reverse order for descending (DESC).
Finally, it’s important to point out that the ORDER BY statement always goes after the WHERE clause.
On Your Own: The Sales Director calls and requests a list of all accounts arranged in order of billing state. Write a SOQL query that returns the name, annual revenue, rating, and billing state of all accounts. Make sure the records are returned alphabetically by state.
Making Your Query Easier to Read
You might have noticed that our queries are getting pretty long and difficult to follow when written as a single line of text. For this reason, it’s not uncommon for people to break up their queries over several lines and add indentations or spaces to make them more readable. Since the query editor ignores all these extra line breaks and spaces we can arrange it like this:
SELECT Id, Name, AnnualRevenue
FROM Account
WHERE AnnualRevenue > 50000000
ORDER BY AnnualRevenue DESC
But if you’re not too fussy about these things, just creating a new line break for each major keyword (when it makes sense) is good enough:
SELECT Id, Name, AnnualRevenue
FROM Account
WHERE AnnualRevenue > 50000000
ORDER BY AnnualRevenue DESC
Expanding Your WHERE Filter With Logical Operators: AND, OR, NOT
But what if we want to add additional filters? We can do that using logical operators (AND, OR, NOT). As an example, let’s also restrict our last query by the rating field and choose the picklist value ‘Hot’. To accomplish this, we’ll add AND. And since we’ll be referencing a picklist value, we’ll need to make sure we put it in single quotes.
SELECT Id, Name, AnnualRevenue, Rating
FROM Account
WHERE AnnualRevenue > 50000000
AND Rating = 'Hot'
ORDER BY AnnualRevenue DESC
Now we’re getting records that meet both WHERE statement conditions.
But now you might be thinking, can we use an OR statement as well? You bet! Let’s replace the AND with OR in the last query above.
SELECT Id, Name, AnnualRevenue, Rating
FROM Account
WHERE AnnualRevenue > 50000000
OR Rating = 'Hot'
ORDER BY AnnualRevenue DESC
Copy, paste, and run the above query and you’ll notice more records were returned than last time.
But can we use both AND and OR in the WHERE statement at the same time? Sure! But now we need to use parenthesis around our OR clause. As an example, let’s return the AND to the above statement but add an additional OR statement with two conditions. Here we’ll make it so that the Rating = ‘Hot’ OR the Industry = ‘Hospitality’.
SELECT Id, Name, AnnualRevenue, Rating
FROM Account
WHERE AnnualRevenue > 50000000
AND (Rating = 'Hot' OR Industry = ‘Hospitality’)
ORDER BY AnnualRevenue DESC
Finally, what if we didn’t want to see any account that’s rated ‘Hot’? This is where we could use the NOT logical operator. Let’s update the query to reflect the new requirement:
SELECT Id, Name, AnnualRevenue, Rating, Industry
FROM Account
WHERE AnnualRevenue > 50000000
AND ((NOT Rating = 'Hot')
OR Industry = 'Hospitality')
ORDER BY AnnualRevenue DESC
Now we’re getting results that do not include ‘Hot’ in the Rating’s column, but do include other possibilities, such as ‘Warm’ and ‘Cold’. Notice that we wrapped the entire NOT clause in parentheses like this: (NOT Rating = ‘Hot’). This is required when we’re combining it with logical operators (AND, OR).
Also, as a quick aside, we could have used the != (does not equal) comparison operator instead, like this: Rating != ‘Hot’.
On Your Own: The Customer Service Director asks you to create a dynamic Case report. She wants to see all cases created in the last two days whose status is ‘Escalated’. She also wants to see the oldest cases listed first. Before you open Report Builder, you decide to write a quick SOQL query to use as a prototype. Include the subject, status, priority, and created date as fields. Write and execute the query in the dev console. Tip: Using a dev org? Create at least two new cases before you run the query. Make sure at least one of them has the status ‘Escalated’.
Limiting the Number of Records Returned
But what if we want the query to return just 1 or 10 or 100 records? For example, what if we wanted to only see the top account ranked by annual revenue? This is where the LIMIT statement comes in handy. Just like the name implies, it limits the number of records returned by the number we indicate (eg, LIMIT 1):
SELECT Id, Name, AnnualRevenue
FROM Account
WHERE AnnualRevenue > 50000000
ORDER BY AnnualRevenue DESC
LIMIT 1
If you copy and paste the above query into the dev console and execute it, you will see that it only returns the account with the highest annual revenue. It’s important to note that we still need to use the ORDER BY clause and DESC to ensure the highest amount is the first record returned. Also, the LIMIT clause always goes at the end of the query.
On Your Own: You want to find the oldest open case in your org. Include subject, status, created date and closed date in your query. How can you use LIMIT to return the case record that meets the criteria? Tip: Don’t forget to filter the query and use ORDER BY to return the correct record.
Beware of Nulls
A null is an empty field. Unless a field is required, there’s a good chance many fields on your object will be empty (null). By default, SOQL returns nulls first for the field specified in the ORDER BY clause. For this reason, nulls can cause unexpected results.
If we go back to the SOQL query we just performed and remove the WHERE clause, a different account is returned. Now, when you run the below query, you’ll notice that the AnnualRevenue field is null for the record returned.
SELECT Id, Name, AnnualRevenue
FROM Account
ORDER BY AnnualRevenue DESC
LIMIT 1
There are two reasons for this. In the first query, we ensured no nulls would be returned by stating the annual revenue field had to have a value greater than $50,000,000. (For our purposes, this is the same as stating the annual revenue must have a value.) But in the query above (the one without the WHERE clause), all account records are returned, regardless if the AnnualRevenue field is empty (null).
The second reason is that we didn’t tell our query to process nulls last (that is, put them at the bottom of the list). We can do this by adding the NULLS LAST keywords:
SELECT Id, Name, AnnualRevenue
FROM Account
ORDER BY AnnualRevenue DESC NULLS LAST
LIMIT 1
If you run the above query in the dev console, you’ll now get the correct account. Notice that the NULLS LAST goes after the ORDER BY clause, but before the LIMIT keyword. Finally, if you want nulls to come first (even though they will by default), you can include NULLS FIRST in your query.
Another way to bypass the null issue is to simply filter out the nulls: WHERE AnnualRevenue != null
SELECT Id, Name, AnnualRevenue
FROM Account
WHERE AnnualRevenue != null
ORDER BY AnnualRevenue DESC
LIMIT 1
Remember, we are only concerned with nulls when we are ordering the results by a field that may include nulls.
How to Pronounce SOQL?
Since we’re using the term a lot, it might be a good idea to know how to pronounce SOQL. Unfortunately, your guess is as good as mine.
First, some people (but not many) simply pronounce each letter (S, O, Q, L). This is because SQL, which stands for Structured Query Language, is officially pronounced this way (S, Q, L). That said, many people pronounce SQL as sequel (SEE-kwel). Following this convention, you’ll sometimes hear people refer to SOQL as SOH-kwel.
Salesforce, on the other hand, states SOQL is pronounced sockle. But it’s not clear if this means SAH-cull or SOH-cull. But you’ll hear both pronunciations in the ecosystem.
Finally, Salesforce Golden Hoodie recipient David Liu of Apex Academy fame insists it’s pronounced sock-quill (rhymes with NyQuil). And since he’s a smart guy, you might want to follow his lead.
Regardless of the “right” pronunciation, my advice is to choose the one you like and say it with confidence.

Create Your Own SOQL Queries
Now play around with the query editor. Try different objects, different fields, different WHERE clauses, and different ORDER BY clauses. Once you’ve done that, you might be ready to take on the following challenges.
SOQL Challenges: Test Your Knowledge
Challenge 1: Write a SOQL query that returns the subject, status, and created date of all cases where the status is new.
Challenge 2: Write a SOQL query that returns the Id, full name, and mailing city of all of your contacts, but arranged alphabetically by last name.
Challenge 3: Write a SOQL query that returns the ‘Closed Won’ opportunity with the highest amount in the past 30 days. Include the following fields: name, stage name, amount, and close date. Make sure currency and date fields are formatted.
Don’t peek at the answers until you’ve made a solid effort to solve them! Feeling stuck? Use the table of contents at the top to search a specific topic (eg, Ordering Your Results: ORDER BY).

Challenge 1 Answer
SELECT Subject, Status, CreatedDate
FROM Case
WHERE Status = 'New'
Challenge 2 Answer
SELECT Id, Name, MailingCity
FROM Contact
ORDER BY LastName
Challenge 3 Answer
SELECT Name, StageName, FORMAT(Amount), FORMAT(CloseDate)
FROM Opportunity
WHERE StageName = 'Closed Won'
AND CloseDate = LAST_N_DAYS:30
ORDER BY Amount DESC
LIMIT 1
If you were able to complete the challenges (without peeking!), then you’re ready for Part 2. That’s where you’ll learn to pull in fields from related records (ie, parent and child records). As you can imagine, this is when SOQL queries really start delivering! You’ll also be introduced to the keywords LIKE and IN, advanced techniques for filtering your data in the WHERE clause.
Had trouble with the challenges? Go back and review everything you learned above. Also, be sure to follow along in your own dev org. Like everything in life, you learn best by doing.
Part 2: Traversing Objects – Parent and Child Fields
Part 3: The Real Magic: Aggregate Queries (COUNT, SUM, AVG, MAX, MIN)
Do you have feedback? I’m always trying to improve this series, so be sure to leave a comment or question below if a concept wasn’t clear. Thank you!