If you’re reading this, it’s probably because somebody told you to bulkify your flow. And you were like, “wut?”
So, what does “bulkify” (or “bulkification”) even mean? The terms themselves are not unique to flows. They actually derive from Apex, the Salesforce coding language.
In short, bulkification refers to designing your flow (or code) in such a way that it handles records in bulk. And the purpose of handling records in bulk is to avoid hitting Salesforce governor limits. Specifically, these limits pertain to SOQL queries and DML statements. You’re allowed 100 SOQL queries and 150 DML statements per transaction. For instance, if you exceed 100 SOQL queries in your flow, you’ll get the following error message: System.limitException: Too many SOQL Queries:101.
To understand what this has to do with flows, here’s a chart that shows which flow elements use SOQL queries and which use DML statements:
| Flow Element | SOQL or DML |
| Get Records | SOQL |
| Create Records, Update Records, Delete Records | DML, SOQL* |
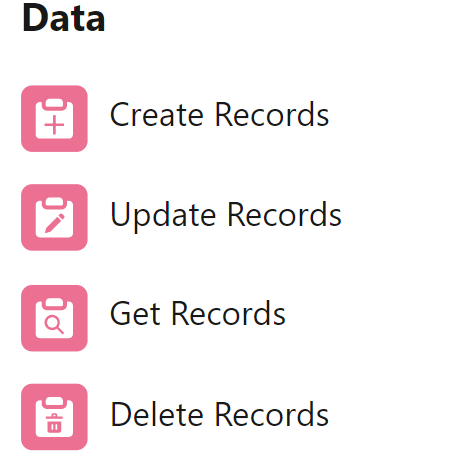
Typically, the most effective way to bulkify your flow is by not repeatedly using these elements to handle single records. And the best way to do that is by not putting them directly in a loop. Often you’ll hear this referred to as avoiding pink in your loops (since that’s the color of the elements found in the chart above). These pink elements all fall under the Data category.
While it may seem easy to avoid hitting your SOQL and DML limits, just imagine updating 500,000 records using Data Loader and having each of these records bumping through your flow. Now imagine more flows being triggered as fields are updated and related records are created. For this reason, it’s possible to reach your governor limits rather quickly. And when that happens, your flow comes to a screeching halt.
So, the first step in bulkifying your flow is to…
1. Avoid Pink Elements in your Loops
This means no Get Records, Update Records, Create Records, or Delete Records elements. Instead, you’re going to strategically include these elements either before the loop (Get Records) or after it (Update Records, Create Records, Delete Records).
Here’s an example of a scheduled-trigger flow that needs to be bulkified:

You don’t have to look too closely at this flow to see that it violates the avoid-pink-in-loops rule. In fact, here we’ve got two loops with pink elements.
What’s this flow doing? This flow is intended to be fairly generic for the purposes of this post. So, you could skip this explanation and still learn about bulkification. But for those who may find it useful, let me explain what’s happening above. This is a scheduled trigger flow and it’s set to fire once (but it could be set to fire weekly). It’s used to update opportunities that are owned by Sales Team members. A record is updated only if the close date has passed (based on today’s date) and the record has not been officially closed (ie, Stage Name not set to ‘Closed Won’ or ‘Closed Lost’). So, here’s what’s happening: (1) It uses a Get Records element to find all users who are Sales Team Members (this could be filtered on the user’s role or profile). (2) It uses a Loop element to loop over the records found in the first step. (3) Inside the loop, it uses a Get Records element to look for any open opportunities where the OwnerId matches the UserId and the close date has passed. (4) It uses another Loop element to loop over each opportunity (found in step 3). This creates a loop inside a loop! Finally, (5) It uses an Update element to update the record after assigning a new close date (using a formula resource that adds 30 days to today’s date). The updates are done one record at a time.
In total, we have 3 pink elements: 2 Get Records (SOQL) and 1 Update Records (DML). The first one is fine since it’s outside the loop. But the other two are going to be problems. In fact, the one that’s really going to work against us is that Update Records element in the second loop. That’s because, depending on how many opportunities are found, we could be utilizing it anywhere from one to dozens of times for each and every Sales Team Member (see the first Get Records element).
To fix the Get Records element in the first loop, we’re going to move it out and place it before the loop and…
2. use the Collection Filter element
That’s right, we’re going to use a Collection Filter element to avoid that pink Get Records element inside the loop. Here’s how that’s going to look:

Above, we moved the Get Records element out of the first loop and replaced it with a Collection Filter element. And while we still have 3 pink elements in our flow, we have now drastically reduced the number of times that second Get Records gets used.
Confused? Let me step you through it:
Let’s say our first Get Records element (Get Sales Team Members) finds 25 members. (Each one of these members is a User record.) When we reach the second Get Records element (Find Open Opportunities) we’re now using it only once — not 25 times like we would have had we kept it inside the loop.
But we’re not simply moving the Get Records elements out of the loop, we’re also updating its filter criteria and moving some of it to the Collection Filter element. For example, here’s what the criteria in the Get Records element looked like both before and after it was moved out of the loop:
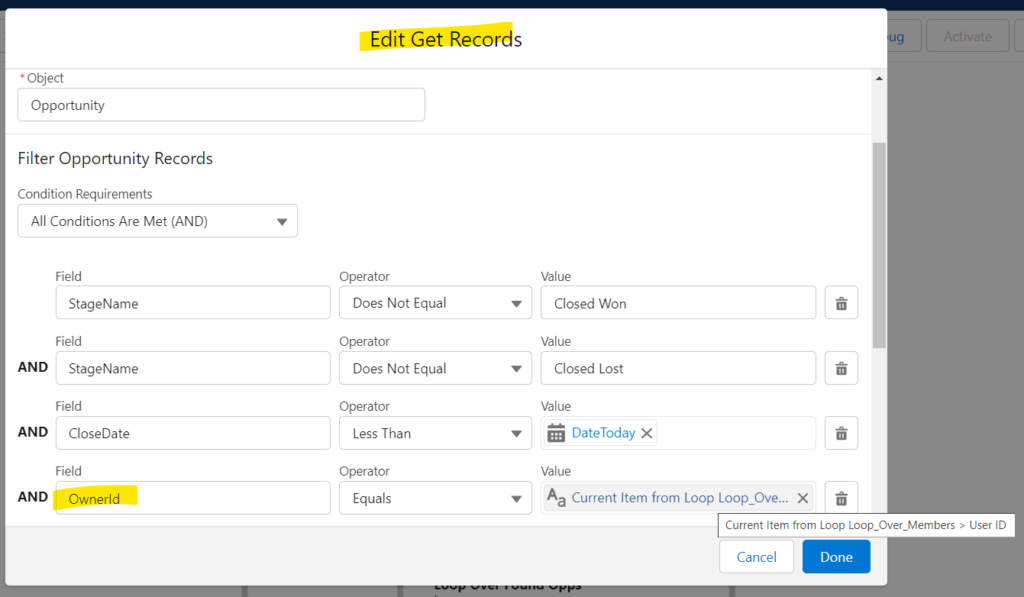
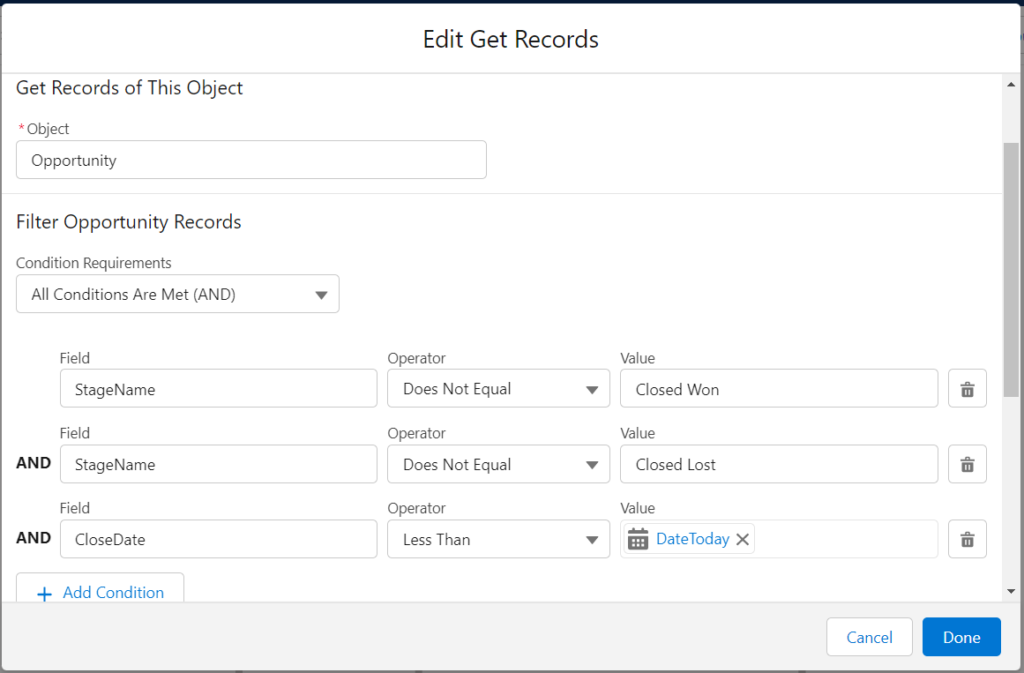
Notice above that we moved the OwnerId criteria from the Get Records to the Collection Filter. See for yourself by taking a peek inside the Collection Filter element below.
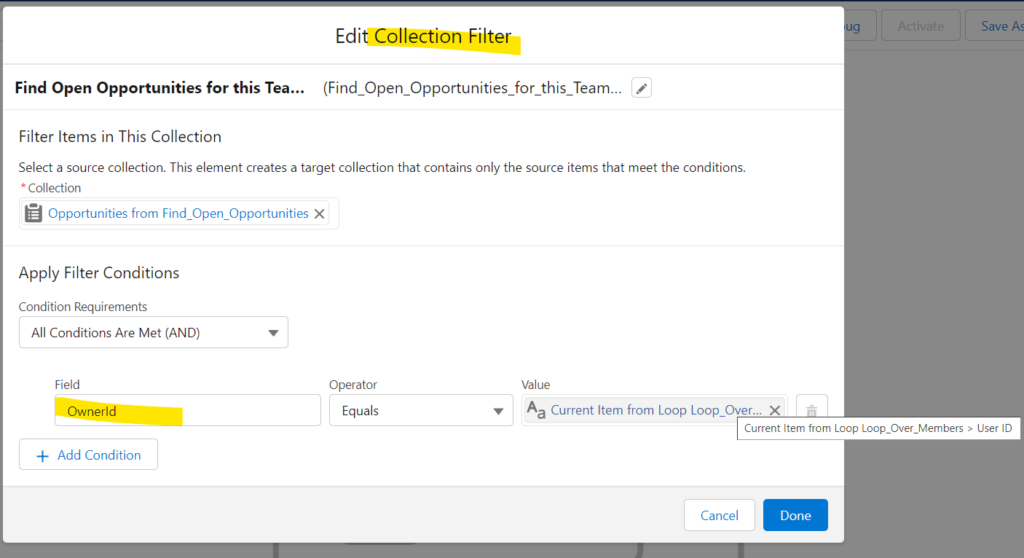
Now, no matter how many times that Collection Filter element is encountered in the first loop (which is determined by how many Team Members were found), we’re not using any more SOQL queries. But — and this is the important part — we’re still getting the records we need. Neat, right?
Next, we need to deal with that Update Records element in the second loop. And the way we deal with that is where the name bulkifying actually comes from…
3. Update Records in Bulk by Placing Them in a Record Collection Variable
Let me repeat that, to bulkify our flow, we’re going to update the records handled in the second loop by putting them in a record collection variable and then updating them in bulk, after the loop.
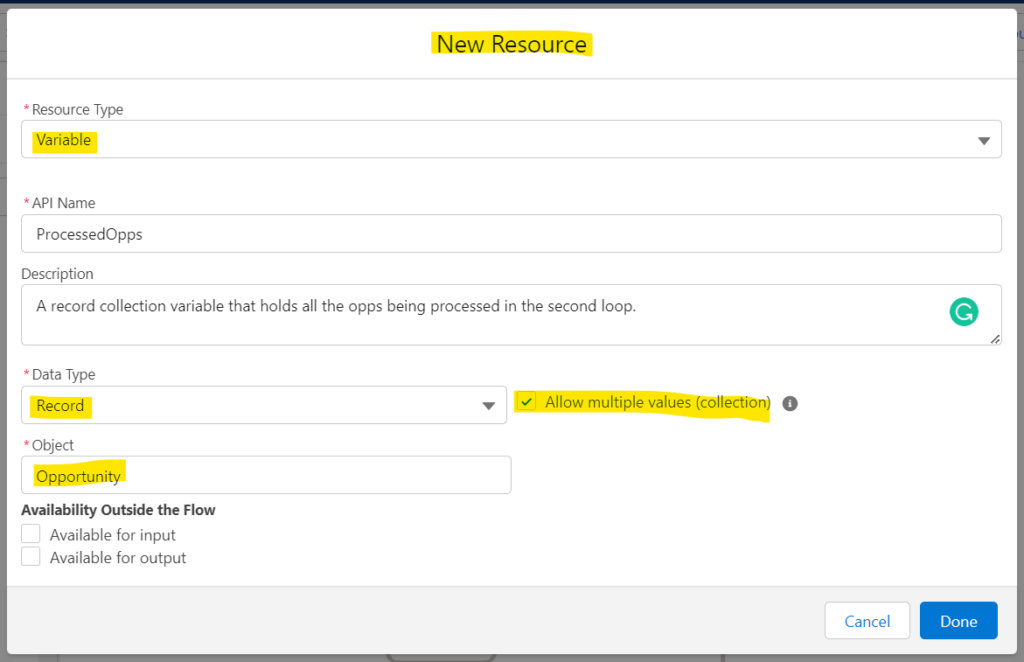
So, the first thing we need to do is create a new resource. This will be a record collection variable for the Opportunity object. I’m going to call it ProcessedOpps. Here’s what it looks like:
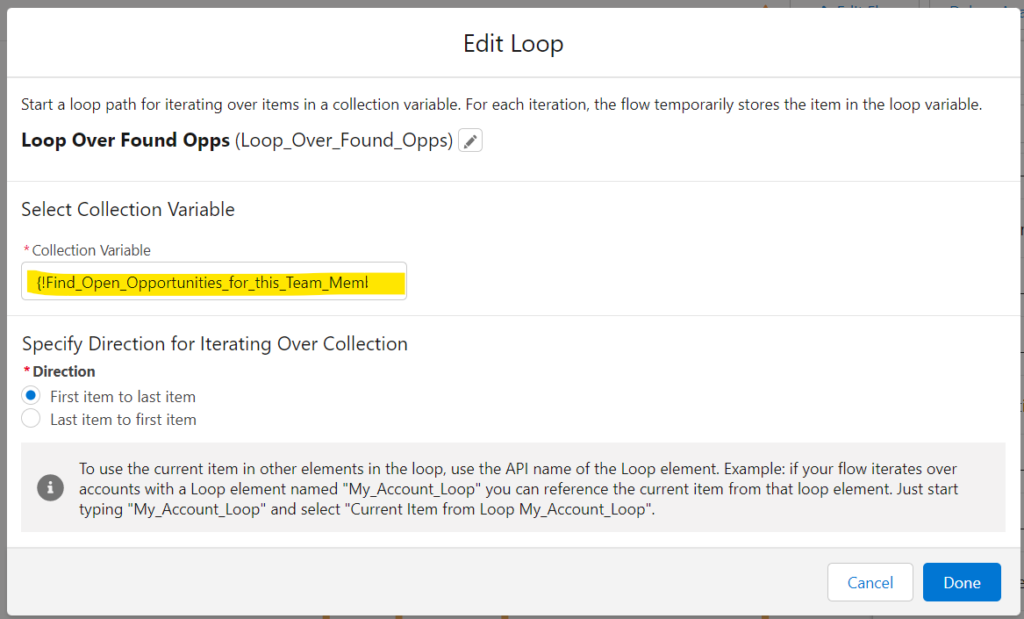
Next, we need to update the Loop element so that it’s directed to loop over the Collection Filter results (Find Open Opportunities for this Team Member), and not the Get Records collection (Find Open Opportunities). It now looks like this inside:
Just as important, we’ll update our Assignment element so that the Opportunity record that’s currently being processed in the loop will be added to the new collection variable (after its close date field is updated). Here, I highlighted the new assignment line inside the Assignment element:
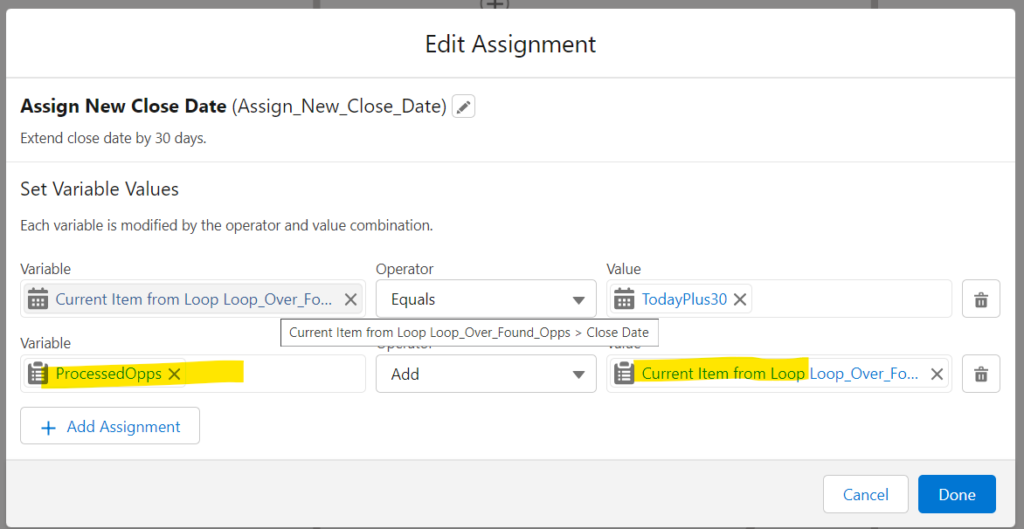
Now, it’s possible that somebody reading this thinks I should have added a second Assignment element to handle that collection variable assignment. And it’s true, back in the olden days (a year ago or so), it was considered good practice to assign the record to a record collection variable in a separate Assignment element. That’s because back then, there was no guarantee that the assignments would occur in the right order. (Imagine if the flow assigned the record to the collection variable first, and then tried to update the CloseDate field.) But that issue has since been resolved and now they’re handled in order. So, no need for a second Assignement element.
Finally, we need to move the Update Records element outside the loop (both loops, that is!) and make sure that it updates the collection variable we created. Here’s what it looks like inside the Update Records element both before and after the move:
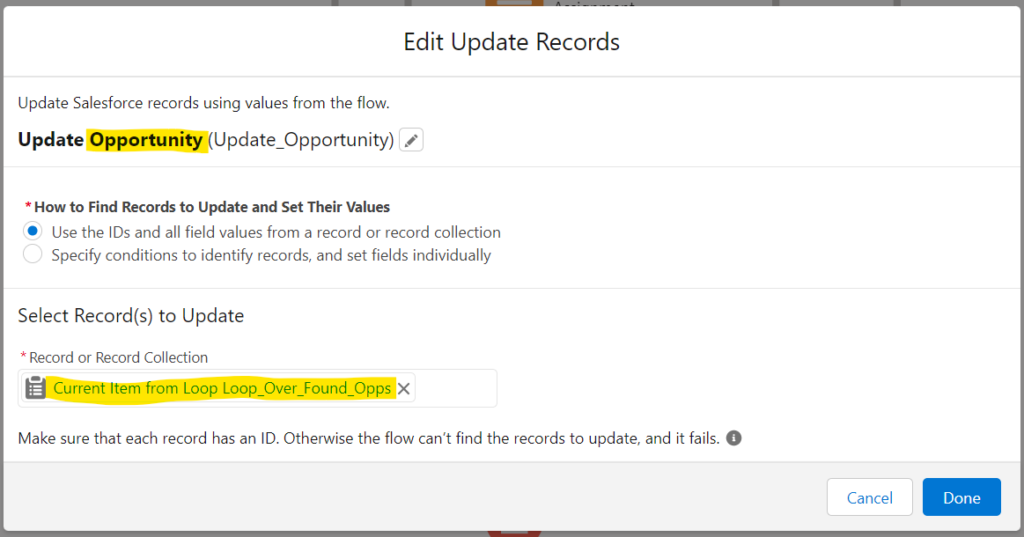
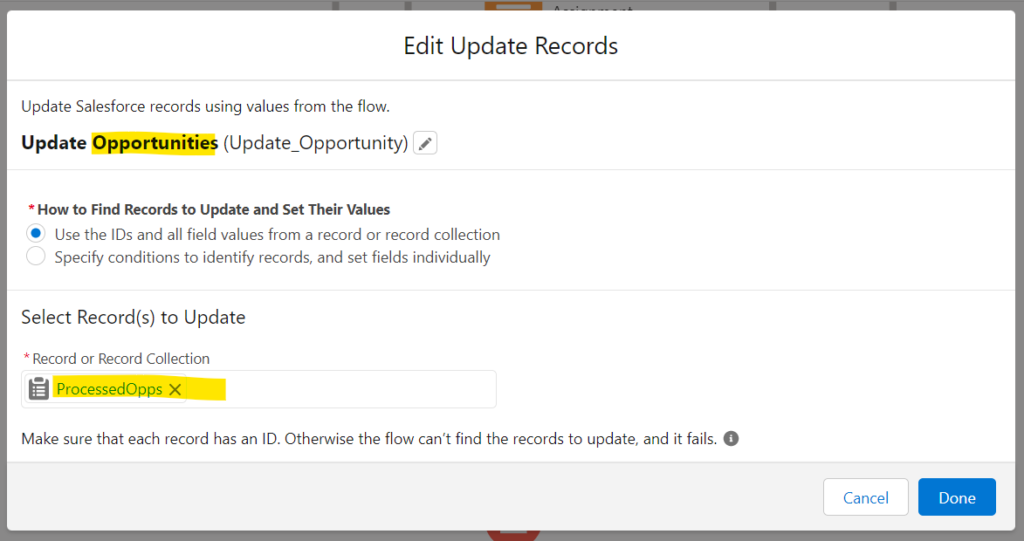
In addition to changing the actual record/collection being updated, I also changed the name of the element since we’ve gone from updating one record at a time to updating multiple records all at once.
The key to this last bulkification step is that it costs us only one DML statement whether we’re updating one record or hundreds of records.
Here’s what the final, bulkified flow looks like:
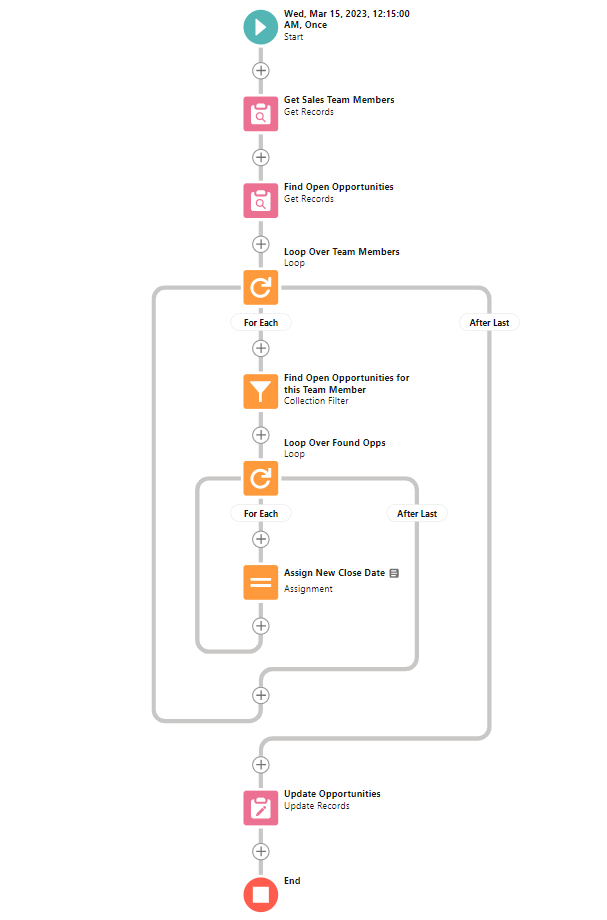
Notice that we successfully moved all pink elements out of the loops. Now, this flow will only cost us 2 SOQL queries (Get Records) and 1 DML statement (Update Records) no matter how many records are funneled through it. Compare that to the original, which could have resulted in 100s of SOQL queries and DML statements.
It’s important to point out that some of the information above has been simplified to make it easier to understand. For instance, there are other factors to consider, including how a flow type can affect the number of transactions that occur in a single flow (eg, a screen flow). Also, to make the flow more efficient, I could have added more logic.
Got questions? Leave a comment below.
(Did I miss something important? Educate me by leaving a comment or reaching out. Thanks!)
What a great post! The screenshots and explanation helped me find a solution to my own use case.
Great! I’m glad you found it helpful.
Great post Neil, thanks!!